Automating weather satellite reception with SatDump's CLI
Also available in: Italiano 🇮🇹
Until now, building your own automated weather station to receive NOAA POES or METEOR-M VHF weather satellites was a complex task involving anywhere from 5 to over 12 separate programs, some of which were obsolete, abandoned by their authors and often they'd crash if you looked at them wrong. I won't even mention the difficulty of building an automated HRPT station.
Thanks to SatDump all this pain and suffering can be put to an end, and you can easily build an automated satellite station that can run on a Raspberry Pi or similar device.
This tutorial is designed to replace Linux-based automated stations that used AltiWx or Bash scripts for scheduling, rtl_fm for recording and WxtoImg or Meteor-Detector for demodulation.
If you are looking for a solution to run on a Windows PC (replacing software like SDR#, WXtoIMG and LRPT Demodulator), follow this guide instead.
The basics
If you already had an automated station, you can skip this section and go straight to the Configuration!
I strongly recommend starting manually using the guides I have written, to get the hang of it and also test your equipment and find out if you have noise problems or line of sight limitations.
This is very useful to know your expectations: you will definitely get at least very slightly worse results than if you do everything manually, it's a given for every automated station!
If you're using a V dipole, you'll quickly find it to be very unsatisfactory for a permanent installation. I strongly recommend switching to a QFH antenna. Tutorials for building a QFH antenna are available, however keep in mind that building a QFH that works somewhat is simple, but building one that works well is very difficult and requires access to a Vector Network Analyser (VNA) for tuning. You can buy a ready-made one from FT8.co.uk at a very reasonable price, or from Wimo. These links are not affiliated, and are only here for your convenience.
Configuration
Download the latest version of SatDump appropriate for your operating system and install it.
For Raspberry Pi (32-bit Raspbian) I've compiled a ready-made version of SatDump, that can be downloaded here. To download it on the Raspberry Pi itself, type:
wget https://www.a-centauri.com/archivio/Radio/satdump_1.1.4-9cac497_armhf.deb.
Automation behavior
The autotracker can work in both single as well as multiple mode.
Single mode
In single mode, if two satellites pass at once, SatDump will select and receive the one with the highest elevation first, then when the first satellite sets, it will switch to the one with a lower elevation and get the rest of its pass.
This mode cannot receive multiple downlinks from a single satellite (e.g. DSB/APT).
This mode is usually used for HRPT reception with a dish rotator.
Multiple mode
In multiple mode, if two satellites pass at once, SatDump will receive both at the same time (including multiple links, such as DSB and APT). Each satellite recording is completely independent.
This mode cannot receive satellites outside of the SDR's bandwidth. The frequency range is decided by the initial_frequency and samplerate parameters. For example, if initial_frequency is 137.5 MHz (137.5e6) and samplerate is 1e6 (1 Ms/s), the usable frequency range will go from 137.0 MHz to 138.0 MHz.
This mode is usually used for APT/LRPT reception with an omnidirectional antenna.
SatDump configuration
SatDump's command line automated tracker is configured thanks to a JSON file you can put in any directory you like.
Before going on, download the template configuration file to your target system.
Tip: to download it on a Raspberry Pi, type:
wget https://www.a-centauri.com/archivio/Radio/autotrack.json.
I recommend to edit the file with a text editor with automated correction and indentation features. Examples include Geany, Sublime Text, Visual Studio Code, Notepad++ and others.
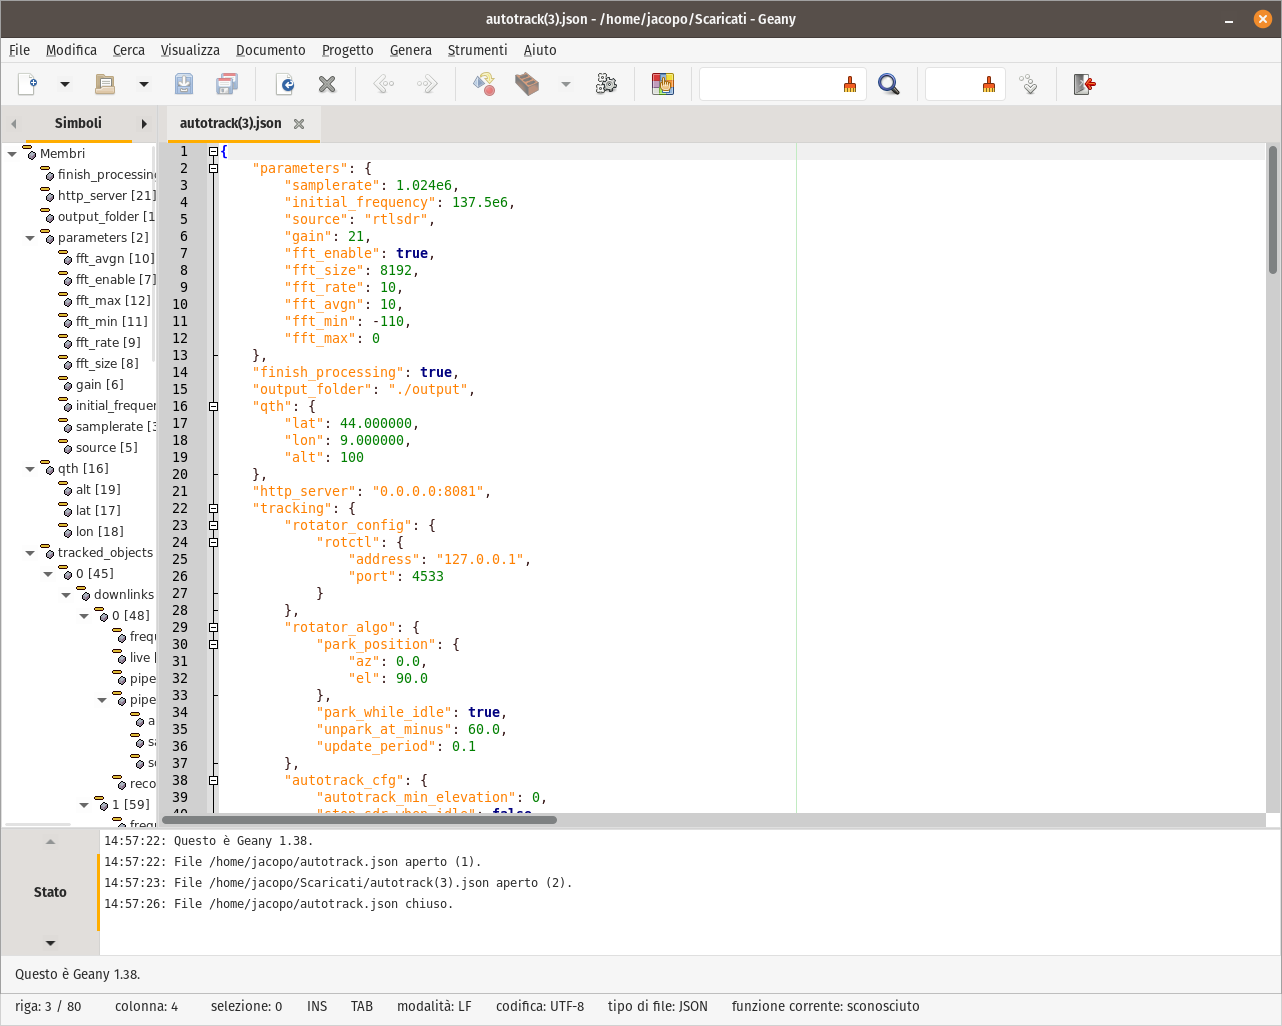
This is how the configuration file appears before editing.
Configuring your SDR
These parameters control the configuration of your SDR.
sourceis the name of the SDR:rtlsdrfor RTL-SDR (RTL-SDR V3, Nooelec SMArt/SMArtee, etc.)airspyfor Airspy deviceshackrffor HackRF originals and clonessdrplayfor genuine SDRplay devices (RSP1A, RSPduo etc.)mirisdrfor Mirics MSI2500 based SDRs such as RSP1 clonesplutosdrfor Analog Devices ADALM-Pluto based SDRs (including AntSDR or PlutoPlus)bladerffor BladeRFlimesdrfor LimeSDR
samplerateis the sample rate of your SDR. For RTL-SDR, select1.024e6which corresponds to 1.024 MHz and is usually adequate.gainis the gain of your SDR. YOU MUST SET THIS MANUALLY AFTER TESTING YOUR STATION. DO NOT USE AGC, IT WILL RESULT IN TERRIBLE IMAGES. DO NOT ASK HOW TO ENABLE AGC.biasis the bias tee control and can betrueorfalse.
For a list of SDR parameters, see the documentation for more details.
Tip: in the file you downloaded the defaults are already set for a RTL-SDR stick. You only need to adjust the gain and bias tee settings.
Configuring the output folder
The automated tracker will output data from the satellites in the folder set in output_folder. You can set either an absolute path, like /home/example/output, or a relative path to the directory where SatDump was started like in the default config file.
Configuring the location
In order for the automated tracker to work, the location needs to be configured under the qth section.
latis the latitude expressed in degrees and decimals of degrees (DD.DDDDDD).lonis the latitude expressed in degrees and decimals of degrees (DD.DDDDDD).altis the station's altitude and is expressed in meters.
Configuring the rotator
If you are using an antenna rotator (for example, for HRPT) you can configure it here. For details, see the documentation.
If you are not using a rotator, such as for APT/LRPT, just leave these fields as the default.
Configuring extra parameters
multi_mode: selects single or multiple mode, whereŧrueis multiple mode andfalseis single mode.stop_sdr_when_idle: stops the SDR and DSP when no satellites are in range (lowers resource and power usage)autotrack_min_elevation: if the maximum elevation of a pass is less than this value, the pass will not be recorded.
Selecting and configuring satellites
Tip: if you're only interested in NOAA APT and METEOR LRPT satellites, you can safely skip this. They have already been configured for you.
To select and configure satellites, you need to add an object under the tracked_objects array. Here's a template on what we will work with.
{
"norad": 38771,
"frequency": 1701300000,
"live": true,
"pipeline_name": "metop_ahrpt",
"pipeline_params": {
"write_hpt": true
}
}
noradis the NORAD (USSPACECOM or Catalog) ID of the satellite. You can get it from Gunter's Space Page.frequencyis the frequency of the satellite in Hz.pipeline_nameis the name of the pipeline. For a list, see the documentation.pipeline_paramsare additional parameters for that specific pipeline. For a list, see the documentation.
Make sure to mind the commas and if unsure use a JSON validator to check your work.
Note that the syntax is different if single or multiple mode is used. The syntax above is intended for single mode.
For further information, please refer to the documentation.
Wrapping up
Save the config file to a directory of your choice with any name you want.
For the purposes of this tutorial, I'll assume it has been saved in your home directory as autotrack.json.
Finishing touches
Test run
It is important to do a test run where you attend the station, verify everything is working as it should, adjust the gain to its optimal level, and check what sort of performance you get.
To run SatDump, type satdump autotrack ~/autotrack.json.
When the AOS is reached on the first satellite, SatDump will automatically switch to it and start the recording as configured (and let you know in the CLI with a red AOS!!!!!!!!!!!!!!!!!!!!!!! message - you can't miss it)
When the recording is done (a red LOS!!!!!!!!!!!!!!!!! message will appear), SatDump will automatically process the data. Wait for the products generation to complete.
Then, stop SatDump (CTRL+C). Everything is ready now to make your station permanent.
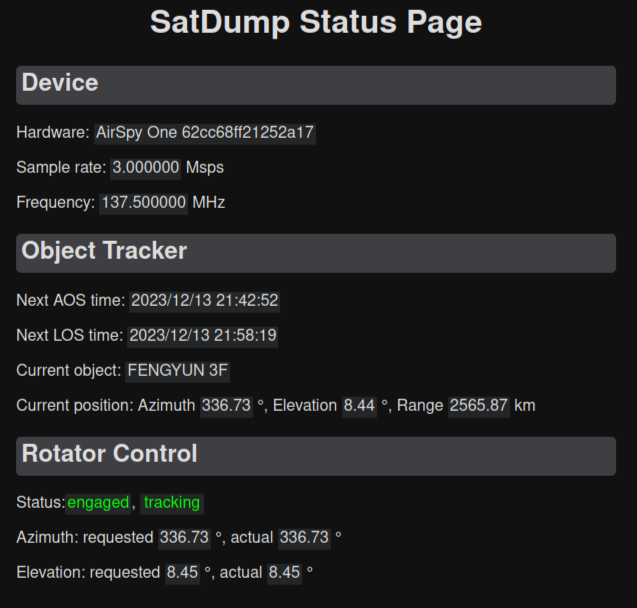
Checking the status from a web browser
Did you know you can monitor SatDump with a web browser, because it has an integrated HTTP server?
You can do so by browsing on http://IP_OF_THE_PC_WHERE_SATDUMP_IS:8081, for example if the IP of the Raspberry Pi is 192.168.1.226, then navigate to http://192.168.1.226:8081.
You'll see a web page with all the info about the automated tracker.
Making it permanent
To make it permanent, as well as make SatDump start automatically if the computer or Raspberry Pi is rebooted (ie. due to a power outage), we need to edit a systemd service.
First, edit the service file: sudo nano /etc/systemd/system/satdump-autotrack.service.
Copy these contents into that file and adjust as needed:
[Unit]
Description=SatDump automated satellite station
After=network.target
StartLimitIntervalSec=0
[Service]
Type=simple
Restart=always
RestartSec=1
# Edit to match your username
User=jacopo
# Edit autotrack.json to match the name and location of your autotrack configuration file
ExecStart=/usr/bin/satdump autotrack autotrack.json
# Edit to match the home directory
WorkingDirectory=/home/jacopo
[Install]
WantedBy=multi-user.target
Save the file.
Run sudo systemctl daemon-reload to make systemd take the new service into account, then sudo systemctl start satdump-autotrack.
Check the status with sudo systemctl status satdump-autotrack. If you see no errors, go ahead. If not, fix them first (usually they are caused by errors in the config file or wrong paths/users).
Once you are positive it is working, make it permanent by doing sudo systemctl enable satdump-autotrack.
You're done!
Appendix
Editing the autogenerated composites to your preferences
SatDump will autogenerate composites (image type and enhancements) following the master configuration file called satdump_cfg.json as detailed in the documentation page for the composite system.
To override these preferences, such as for example to remove a composite you don't like/need, or to add a personalised one, follow these instructions.
-
Locate the master
satdump_cfg.jsonfile. This is usually in/usr/share/satdump/satdump_cfg.json, unless you changed it during the setup phase. Open it in a text editor, such as Textpad or Notepad++. -
Open the user config file in
~/.config/satdump/settings.json. -
To disable generating a composite you do not like, go in the appropriate section (
avhrr_apt) and copy the name of the composite. Then, setautogentofalse. -
To enable a composite, do the same but set
autogentotrue.
For further details see the documentation page.
Hardware requirements
While NOAA APT and Meteor-M LRPT will work on basically any Raspberry Pi from Model 3 onwards (except the Pi Zero), HRPT will require a more careful consideration.
A Raspberry Pi 4 is the bare minimum for live HRPT decoding and it will struggle a bit with Metop AHRPT. Switching to a Raspberry Pi 5 is recommended, as it will have no problem handling both HRPT and AHRPT.
Version: v1.0.0