Also available in: Italiano 🇮🇹
Introduction
The NOAA POES series of satellites are the easiest to receive among all other weather satellites. Their analogue, robust and powerful signal is easy to receive and "forgives" small errors or interference.
However, most of the guides available on the Internet are severely out of date, and as a result receiving these satellites is much harder than what it needs to be. I've written this guide in the hopes of avoiding all the trouble I went through!
If you are interested in satellite imagery, the METEOR satellites are also worth receiving as the image quality and resolution is much better, with almost no extra effort required from your part!
The satellites
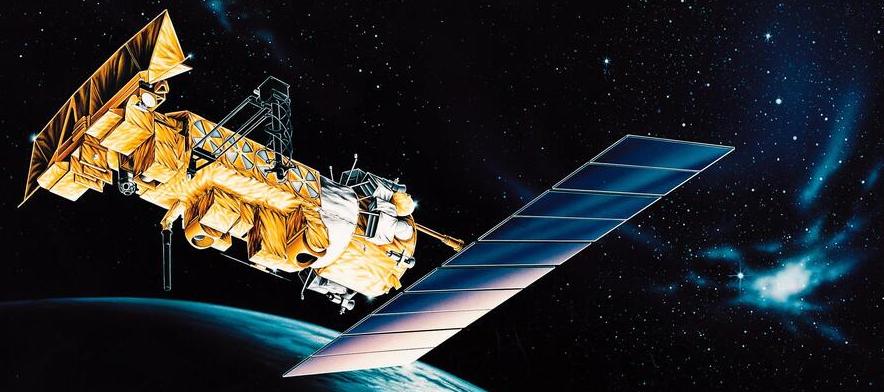
The POES (Polar Operational Environmental Satellites) satellites are a series of sun-synchronous, polar-orbiting satellites that orbit the Earth at around 800 km above the ground. Their orbit is chosen so they pass over the same ground location at roughly the same solar time each day, twice per day.
Three satellites are currently operating: NOAA 15, NOAA 18 e NOAA 19.
NOAA 16 has been decommissioned in 2014 after an ADACS (attitude control system) failure, which sent it tumbling. It later exploded due to a battery fault.. NOAA 17 has officially been decommissioned in 2013, but it operated until much later, before finally suffering a battery failure with explosion in 2021.
Frequencies
| Satellite | Frequency | Mode | Bandwidth | Polarisation |
|---|---|---|---|---|
| NOAA 15 | 137.62 MHz | FM | 50 kHz | RHCP |
| NOAA 18 | 137.9125 MHz | FM | 50 kHz | RHCP |
| NOAA 19 | 137.1 MHz | FM | 50 kHz | RHCP |
Signal description
Imagery from the POES satellites is transmitted using APT (Automatic Picture Transmission), an analogue transmission format.
The modulation is FM (like normal broadcast FM radio), and once demodulated the amplitude of the 2.4kHz carrier tone (recognizable as a continuous "beeping") is used to draw the image line by line, like SSTV.
Hardware
SDR
Any SDR will do, provided it's of good quality. I use a Nooelec SMArtee, which costs about 30 euros. Internally it uses a RTL2832u chip and R860 tuner.
One of the cheapest and best quality SDR dongles is the RTL-SDR V3 that can be found on Amazon and on eBay. These are non affiliated links, and are here just for your convenience.
Beware of fake dongles, always buy on official stores only.
Antenna
For a beginner, a very simple V dipole antenna will be more than enough. Later, for a permanent station, a switch to a more performing QFH antenna is recommended, although for portable use the V dipole can't be beat.
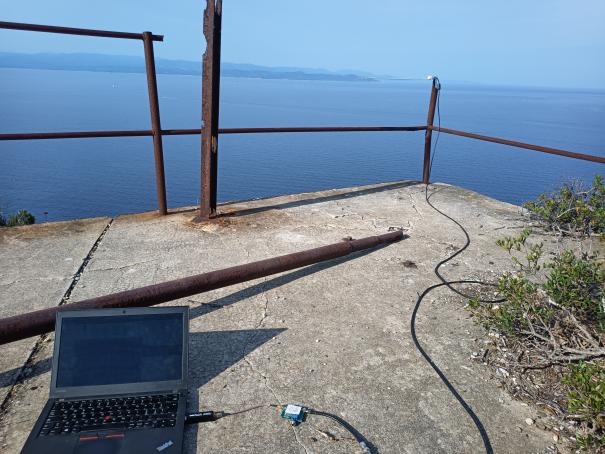
The most important parameter is not the antenna, and neither the SDR. It's the line of sight! It goes without saying that the best spot to receive APT is a mountain top, followed by any sufficiently flat and sparsely populated location such as farm fields.
Being far away from population centers also helps, because switching power supplies, LED lights and powerline communications all produce nasty interference that will greatly hamper APT reception, especially for a beginner.
Once you are confident with the work needed and you got a few images from those ideal locations, you can try from any location with a sufficiently clear view of the sky, such as a city park or rooftop.
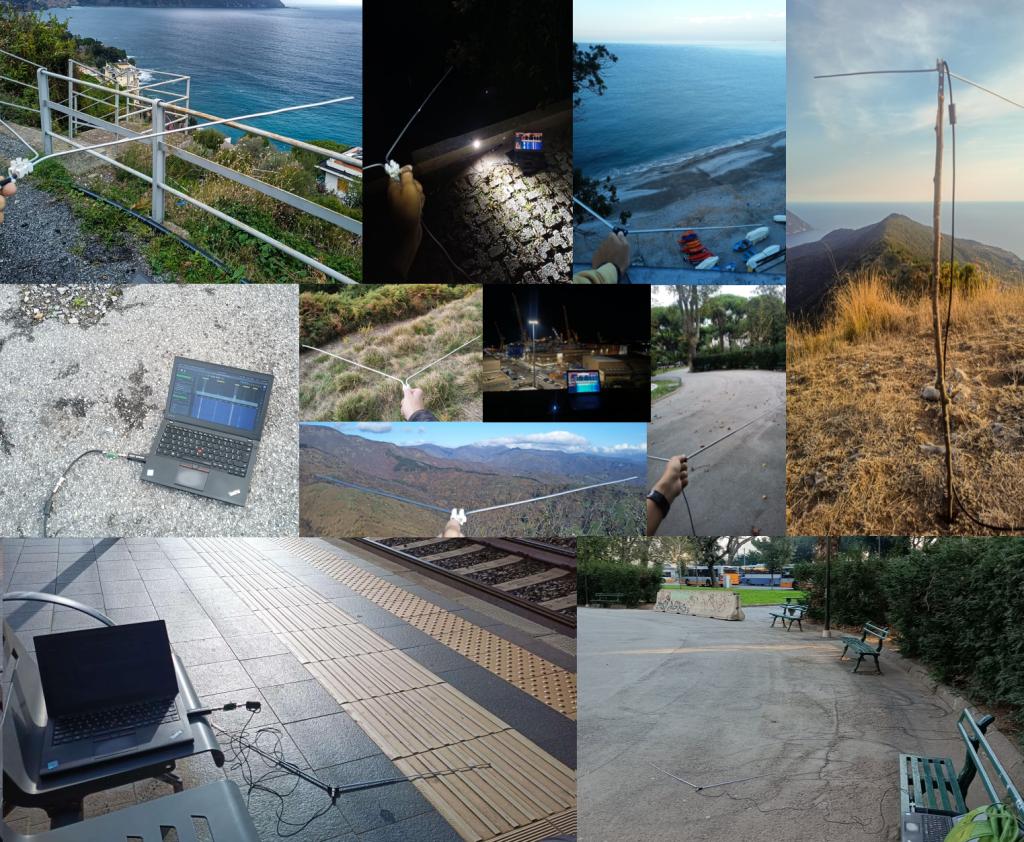
I received excellent images from the most disparate locations, including railway stations, bus stops, schools, beaches, parking lots, castles, monuments and even on a kayak! The APT signal is very strong and can be received easily even with the most rudimentary of equipment at practically any location, making it a fun activity to do "on the go", for example while you wait for your train or bus and a satellite happens to pass overhead.
Just make sure to never position yourself close (~1km | ¼mi) to a FM broadcast transmitter, or the resulting noise will make it impossible to receive anything because of SDR overload.
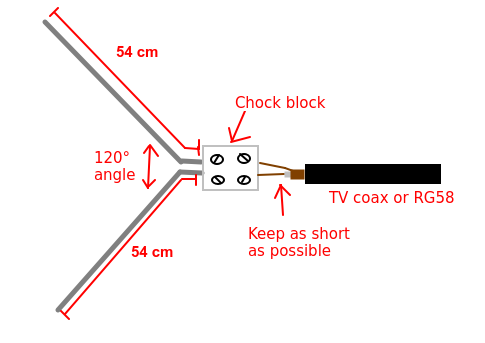
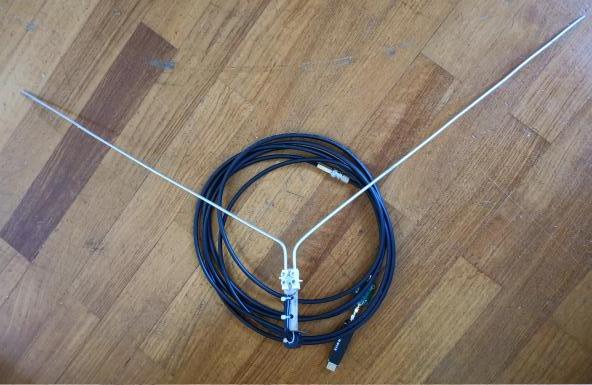
V dipole dimensions and construction tips
These are the dimensions of the V dipole. I've used 3 mm aluminium rods, cut and bent to shape using pliers. Then, a "chock block" (electrical terminal) is used to secure and attach them to the coaxial cable.
LNA
An LNA is not usually necessary and in some situations could even make the situation worse. However, with some "deaf" dongles such as MSI.SDR and even some RTL-SDR, it can help.
The usual SPF5189z boards that can be found all over the Internet are good enough.
I don't recommend buying the Nooelec SAWbird+ NOAA, as it has several design flaws that make it nearly useless.
Software
Most of the guides on the Internet recommend using SDR#, but it has been replaced by the newer, faster and more practical SDR++ by Alexandre Rouma. Among other things, this software sports an unique noise reduction algorithm that has been designed specifically for APT, that greatly improves the quality of images in the presence of interference.
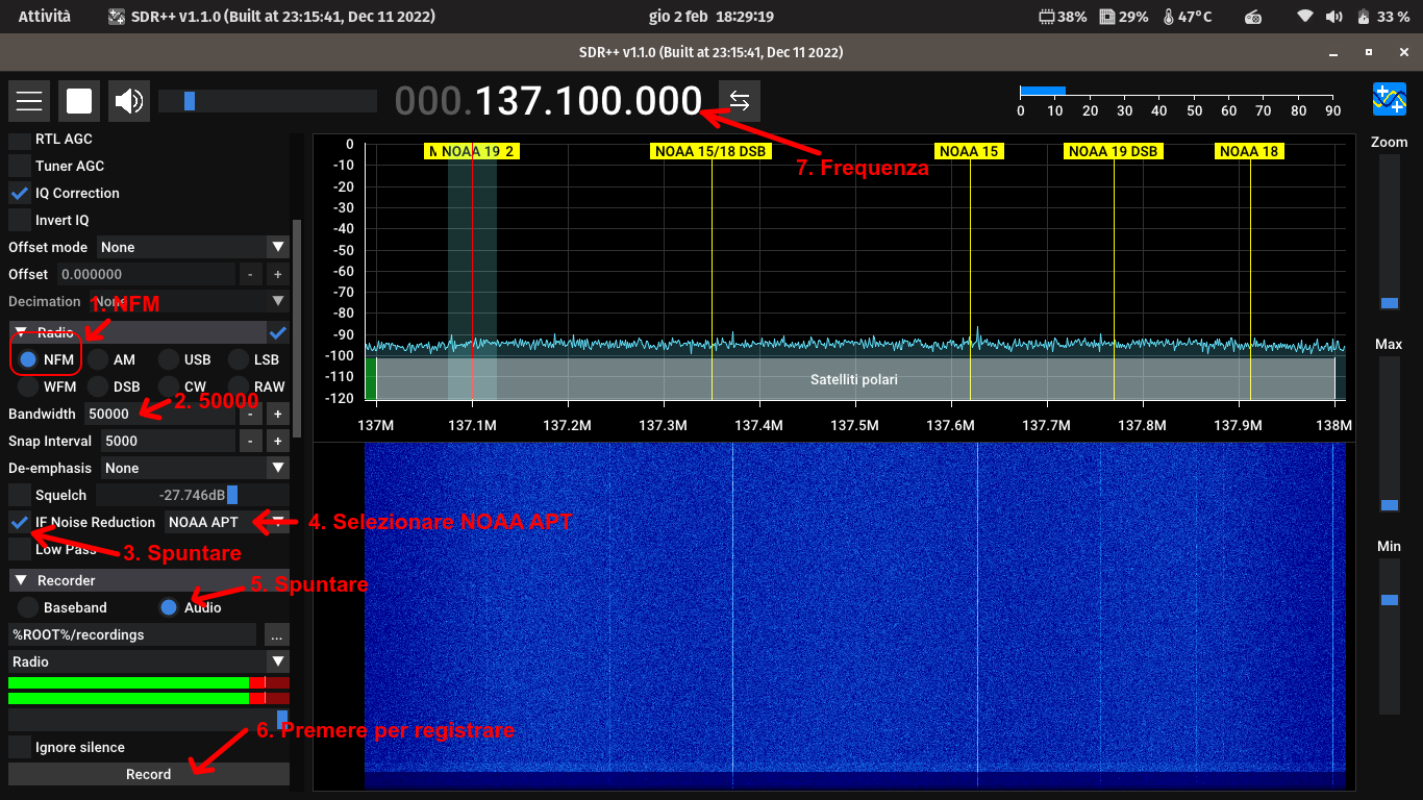
Setting up SDR++
- Open SDR++ and select your SDR.
- Select the NFM mode (Narrow FM) and set the filter to 50 kHz (type
50000) - Check the
Noise Reductionbox and set the mode toNOAA APT - Choose the correct frequency (see the table above)
- Select
Audioin theRecorderpanel (two VU meters will appear)
Everything is now ready!
You might need to adjust your SDR gain later for best results. To adjust it, slowly raise the gain until the signal is as clear as possible.
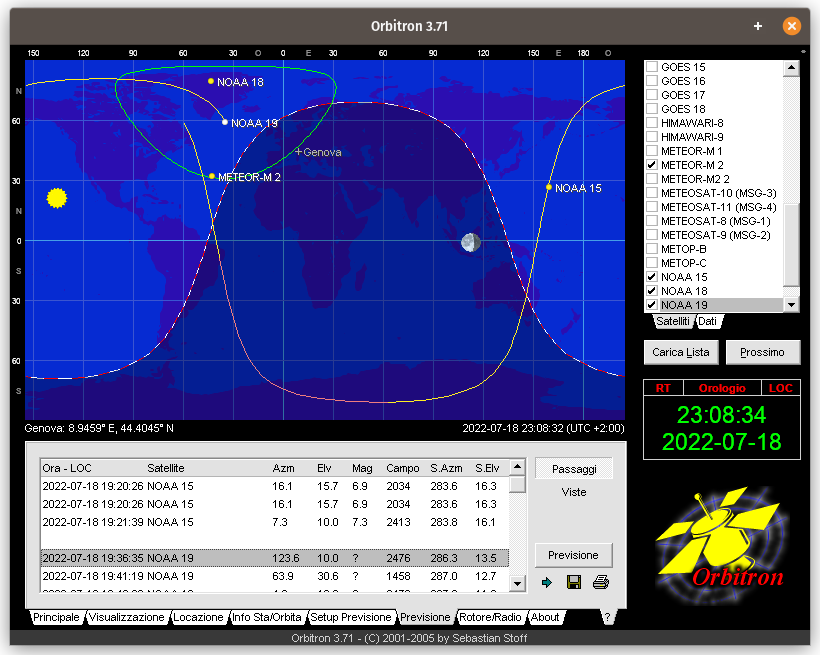
Pass prediction
I recommend using Look4sat on Android phones to predict when the satellite is going to pass over your location. For iOS, SatSat is a good app too. Alternatively, Orbitron and GPredict are also excellent if you prefer to have the software installed on your PC.
Receiving the image
As soon as you have line of sight with the satellite, the very characteristic APT tone will be heard. It will sound like a peculiar beeping, you can't miss it. At that moment, press Record (the time will start counting). Adjust the speaker volume using the slider at the top (do not touch anything in the recorder) so that it is comfortable to listen to (don't mute it, or you'll have a hard time knowing if you get a good or bad image (it will sound like static if it's not working great) - and the sound is part of the experience too!)
When the satellite disappears, do not close SDR++ right away. Instead, stop the recording first, then close SDR++.
Common pitfalls
- NEVER attempt to Doppler correct the signal using Orbitron's or Gpredict's transponder feature. The APT signal has been designed to be received by very cheap receiver in the 1960s, and therefore does not need Doppler correction.
- NEVER use RTL AGC or Tuner AGC. These AGCs are designed for very wide signals such as DVB-T. The gain control will not "see" the APT signal as it's much too narrow, which will result in much higher gain than normal being applied, reducing the signal.
Decoding and processing the image
Decoding and processing with SatDump
SatDump is an all in one solution for everything satellite reception related.
We have worked hard on making the process as easy and seamless as possible, and SatDump now enables you to go from audio recording to full-blown products suitable for weather predictions in only a few clicks!
After installing SatDump, you will be greeted with the Offline Decode tab. Search for the NOAA APT pipeline, and select your recording in the Input File field. Select an empty directory in the Output Directory field.
Make sure to select Input Level as audio_wav and not Baseband!
Do not touch any other option, as they will be filled in automatically!
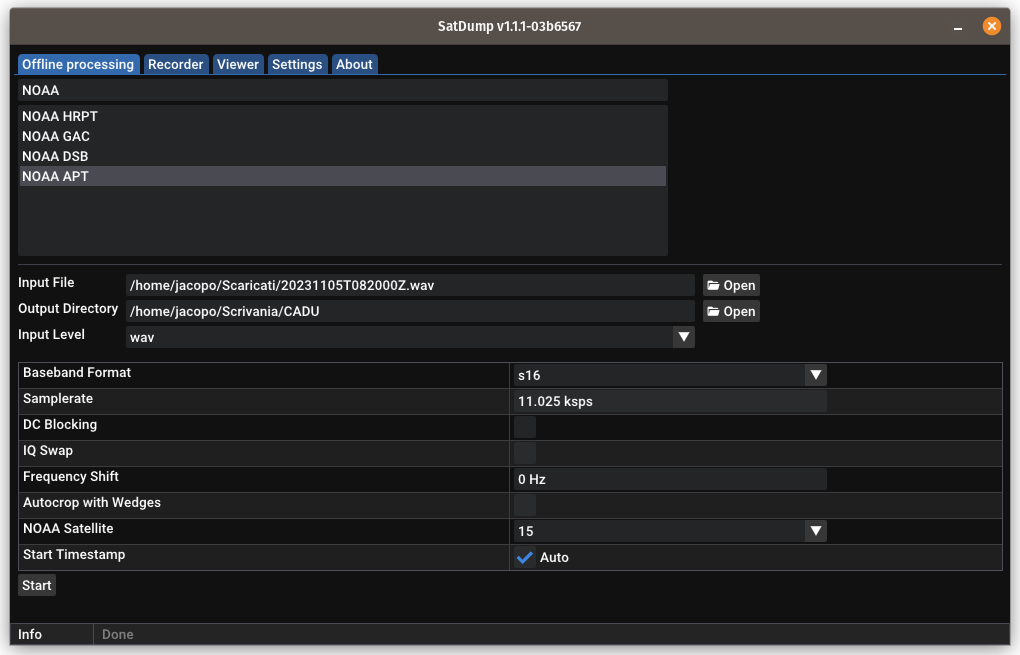
Press the Start button and the APT recording will be decoded and processed automatically.
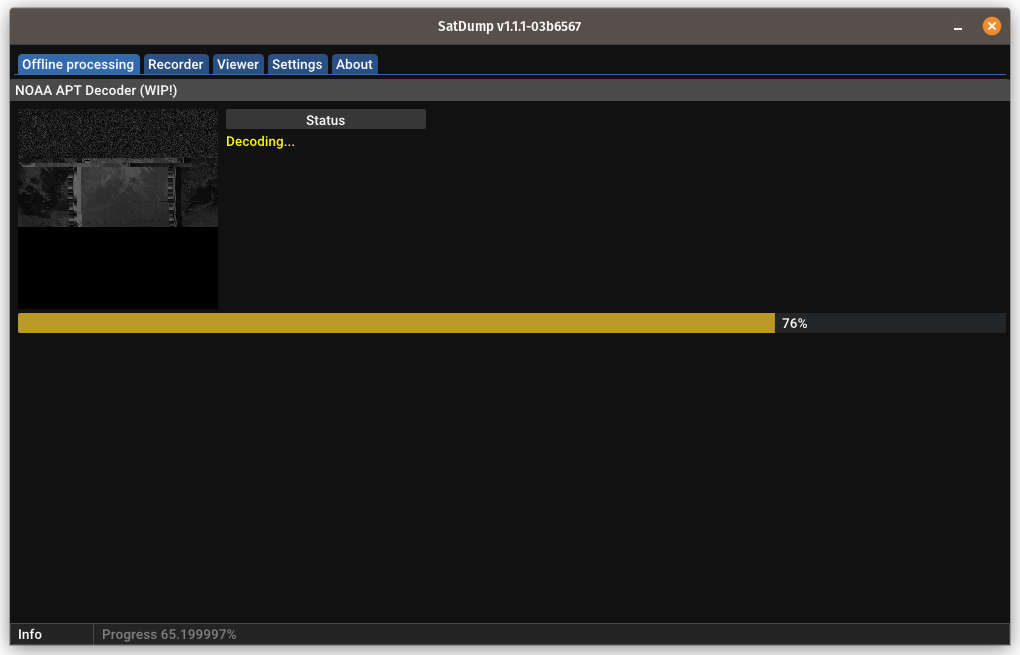
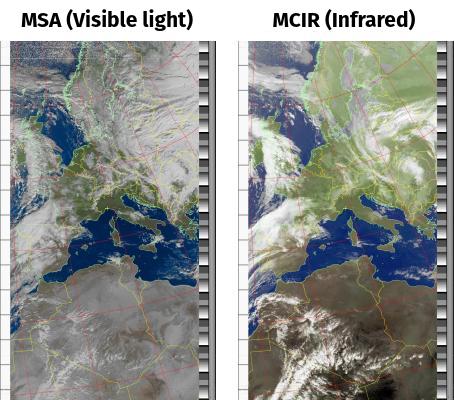
When it is done, some predefined images will be stored in the Output directory you specified in the previous step. However, SatDump supports a full product system that can apply overlays, map outlines, and many other features. To access it, click on the Viewer tab. It is quite intuitive, and you can just play around with the features until you get the result that you like.
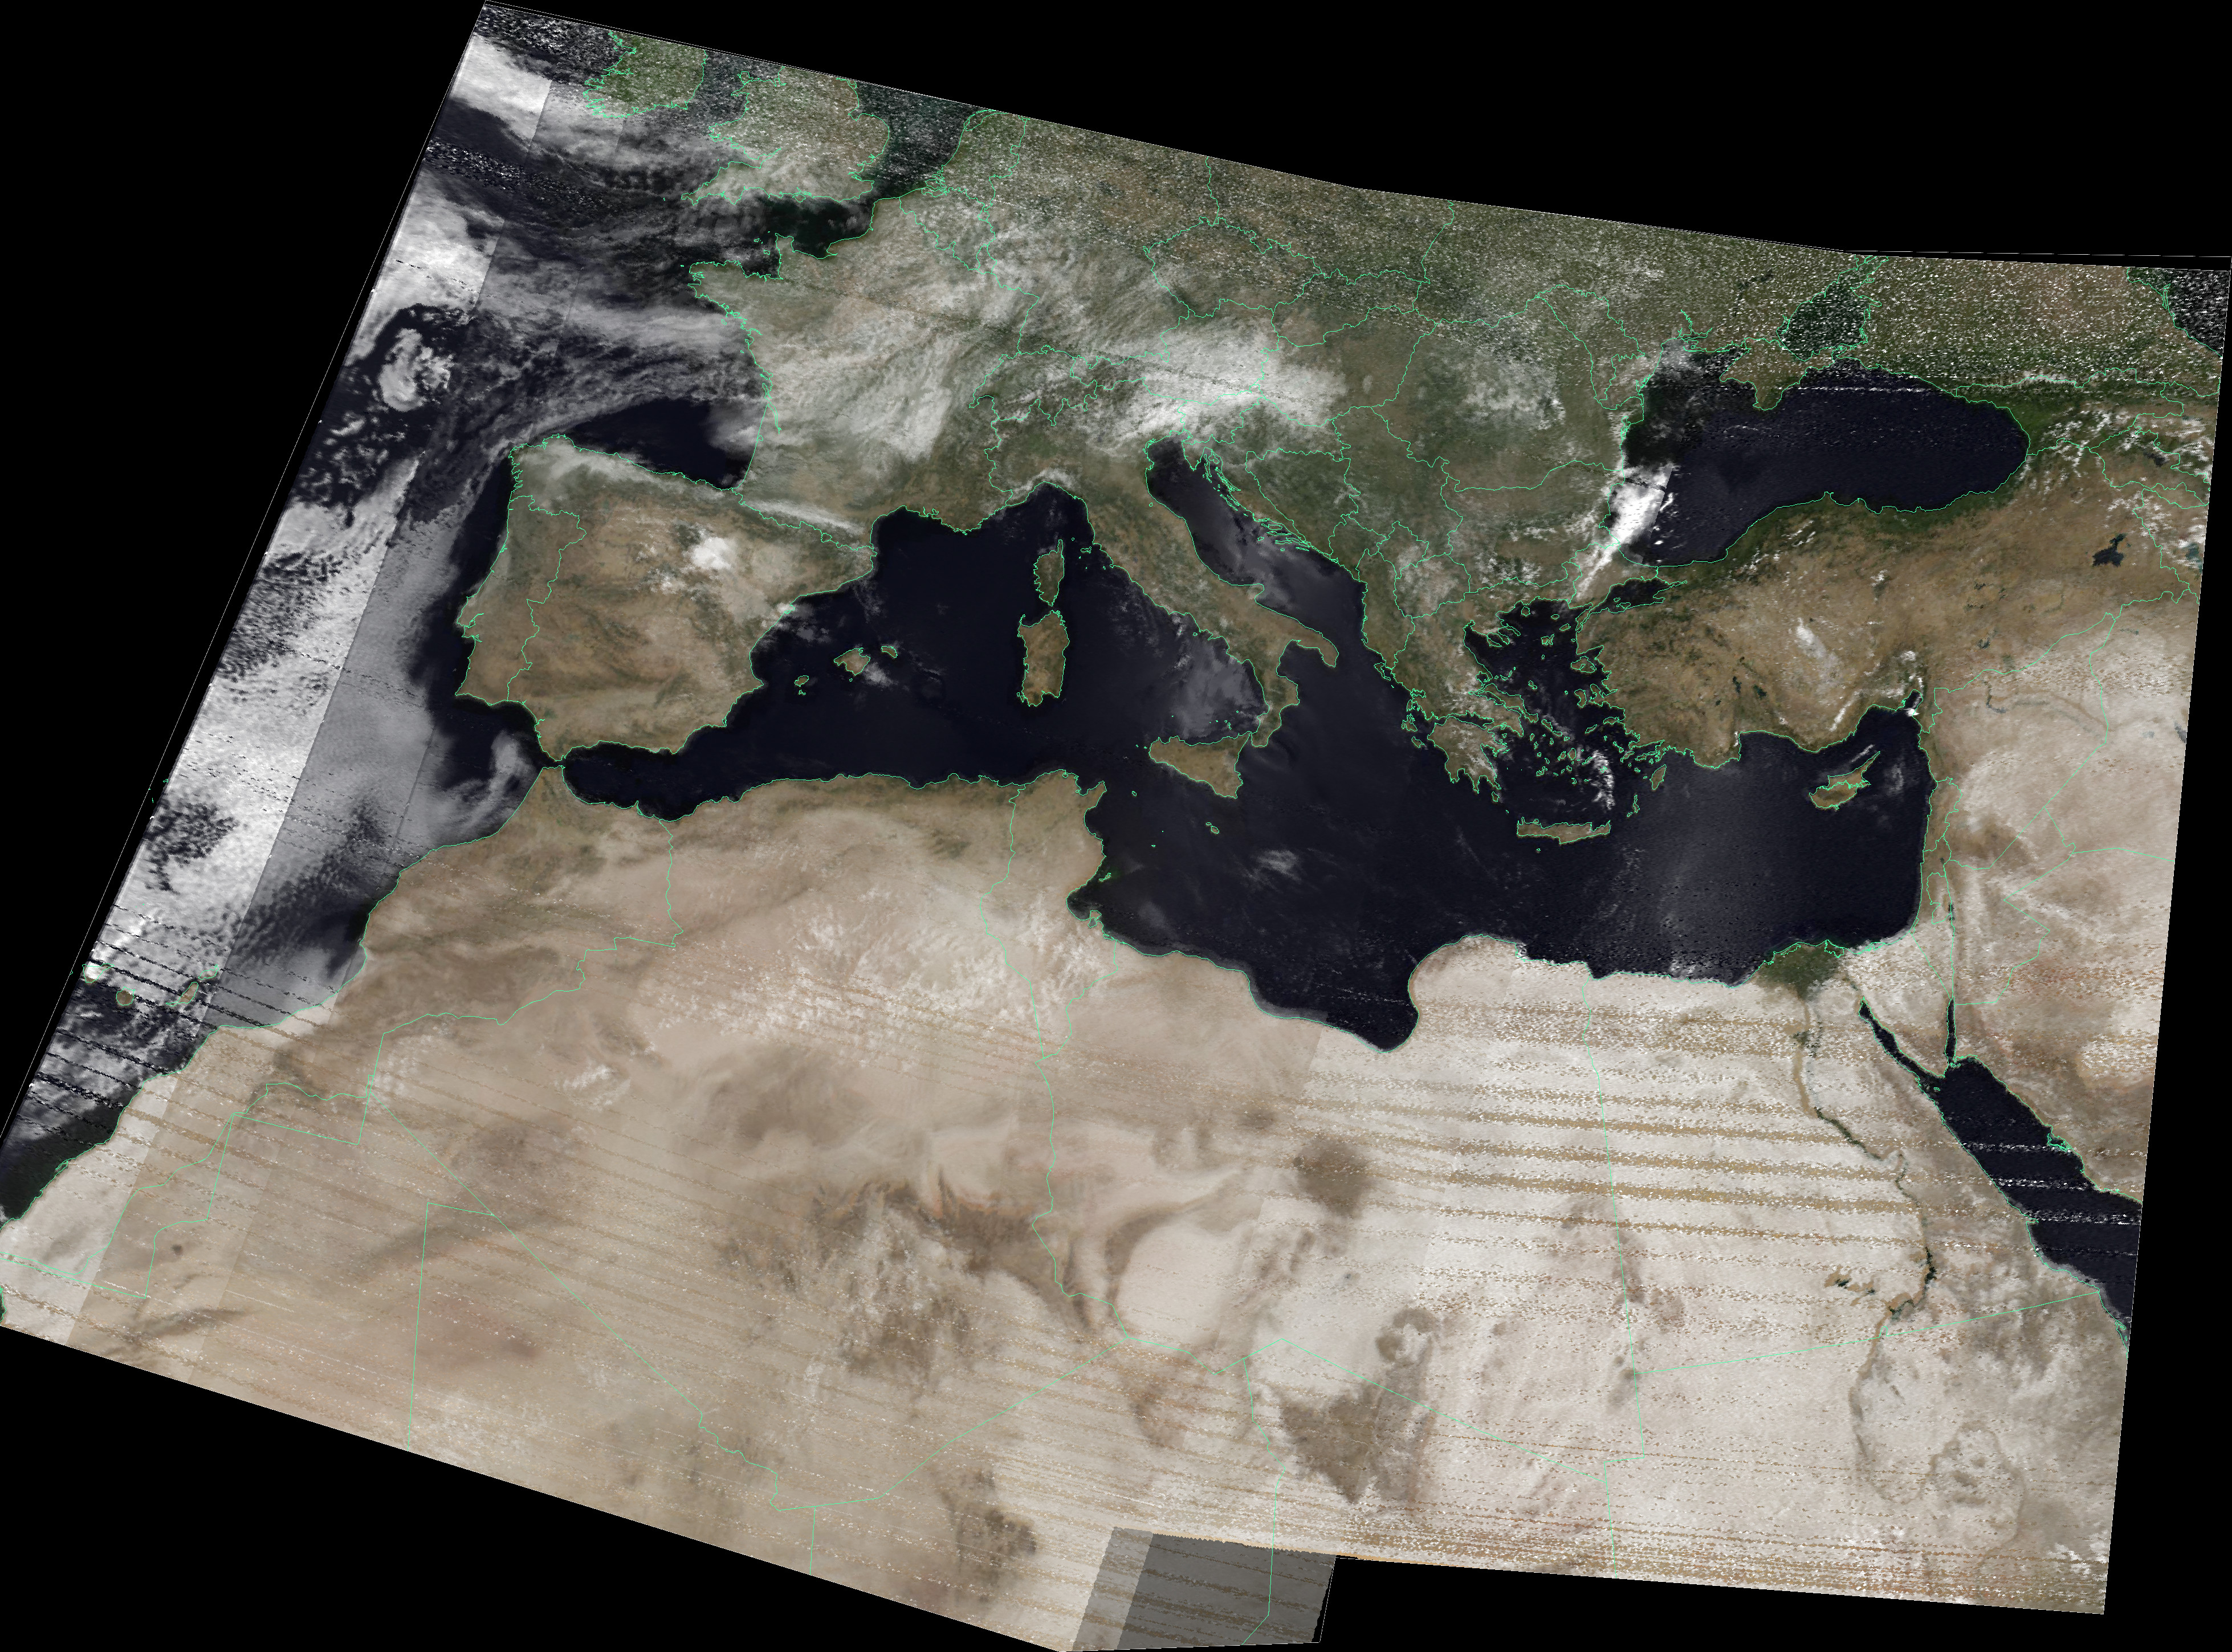
The data can then be used to do actual meteorology very easily!
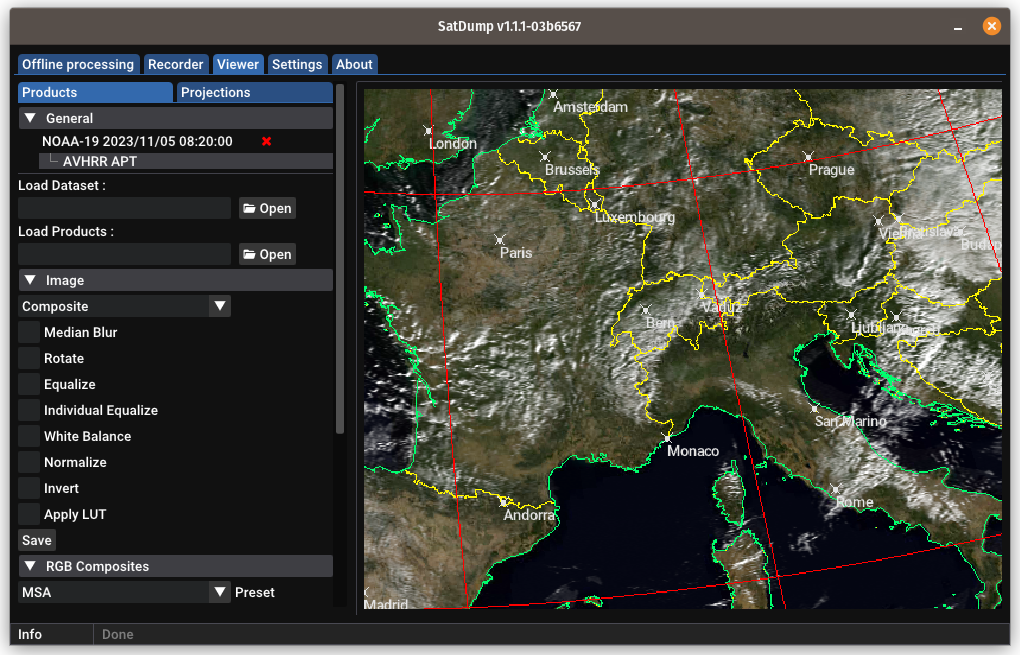
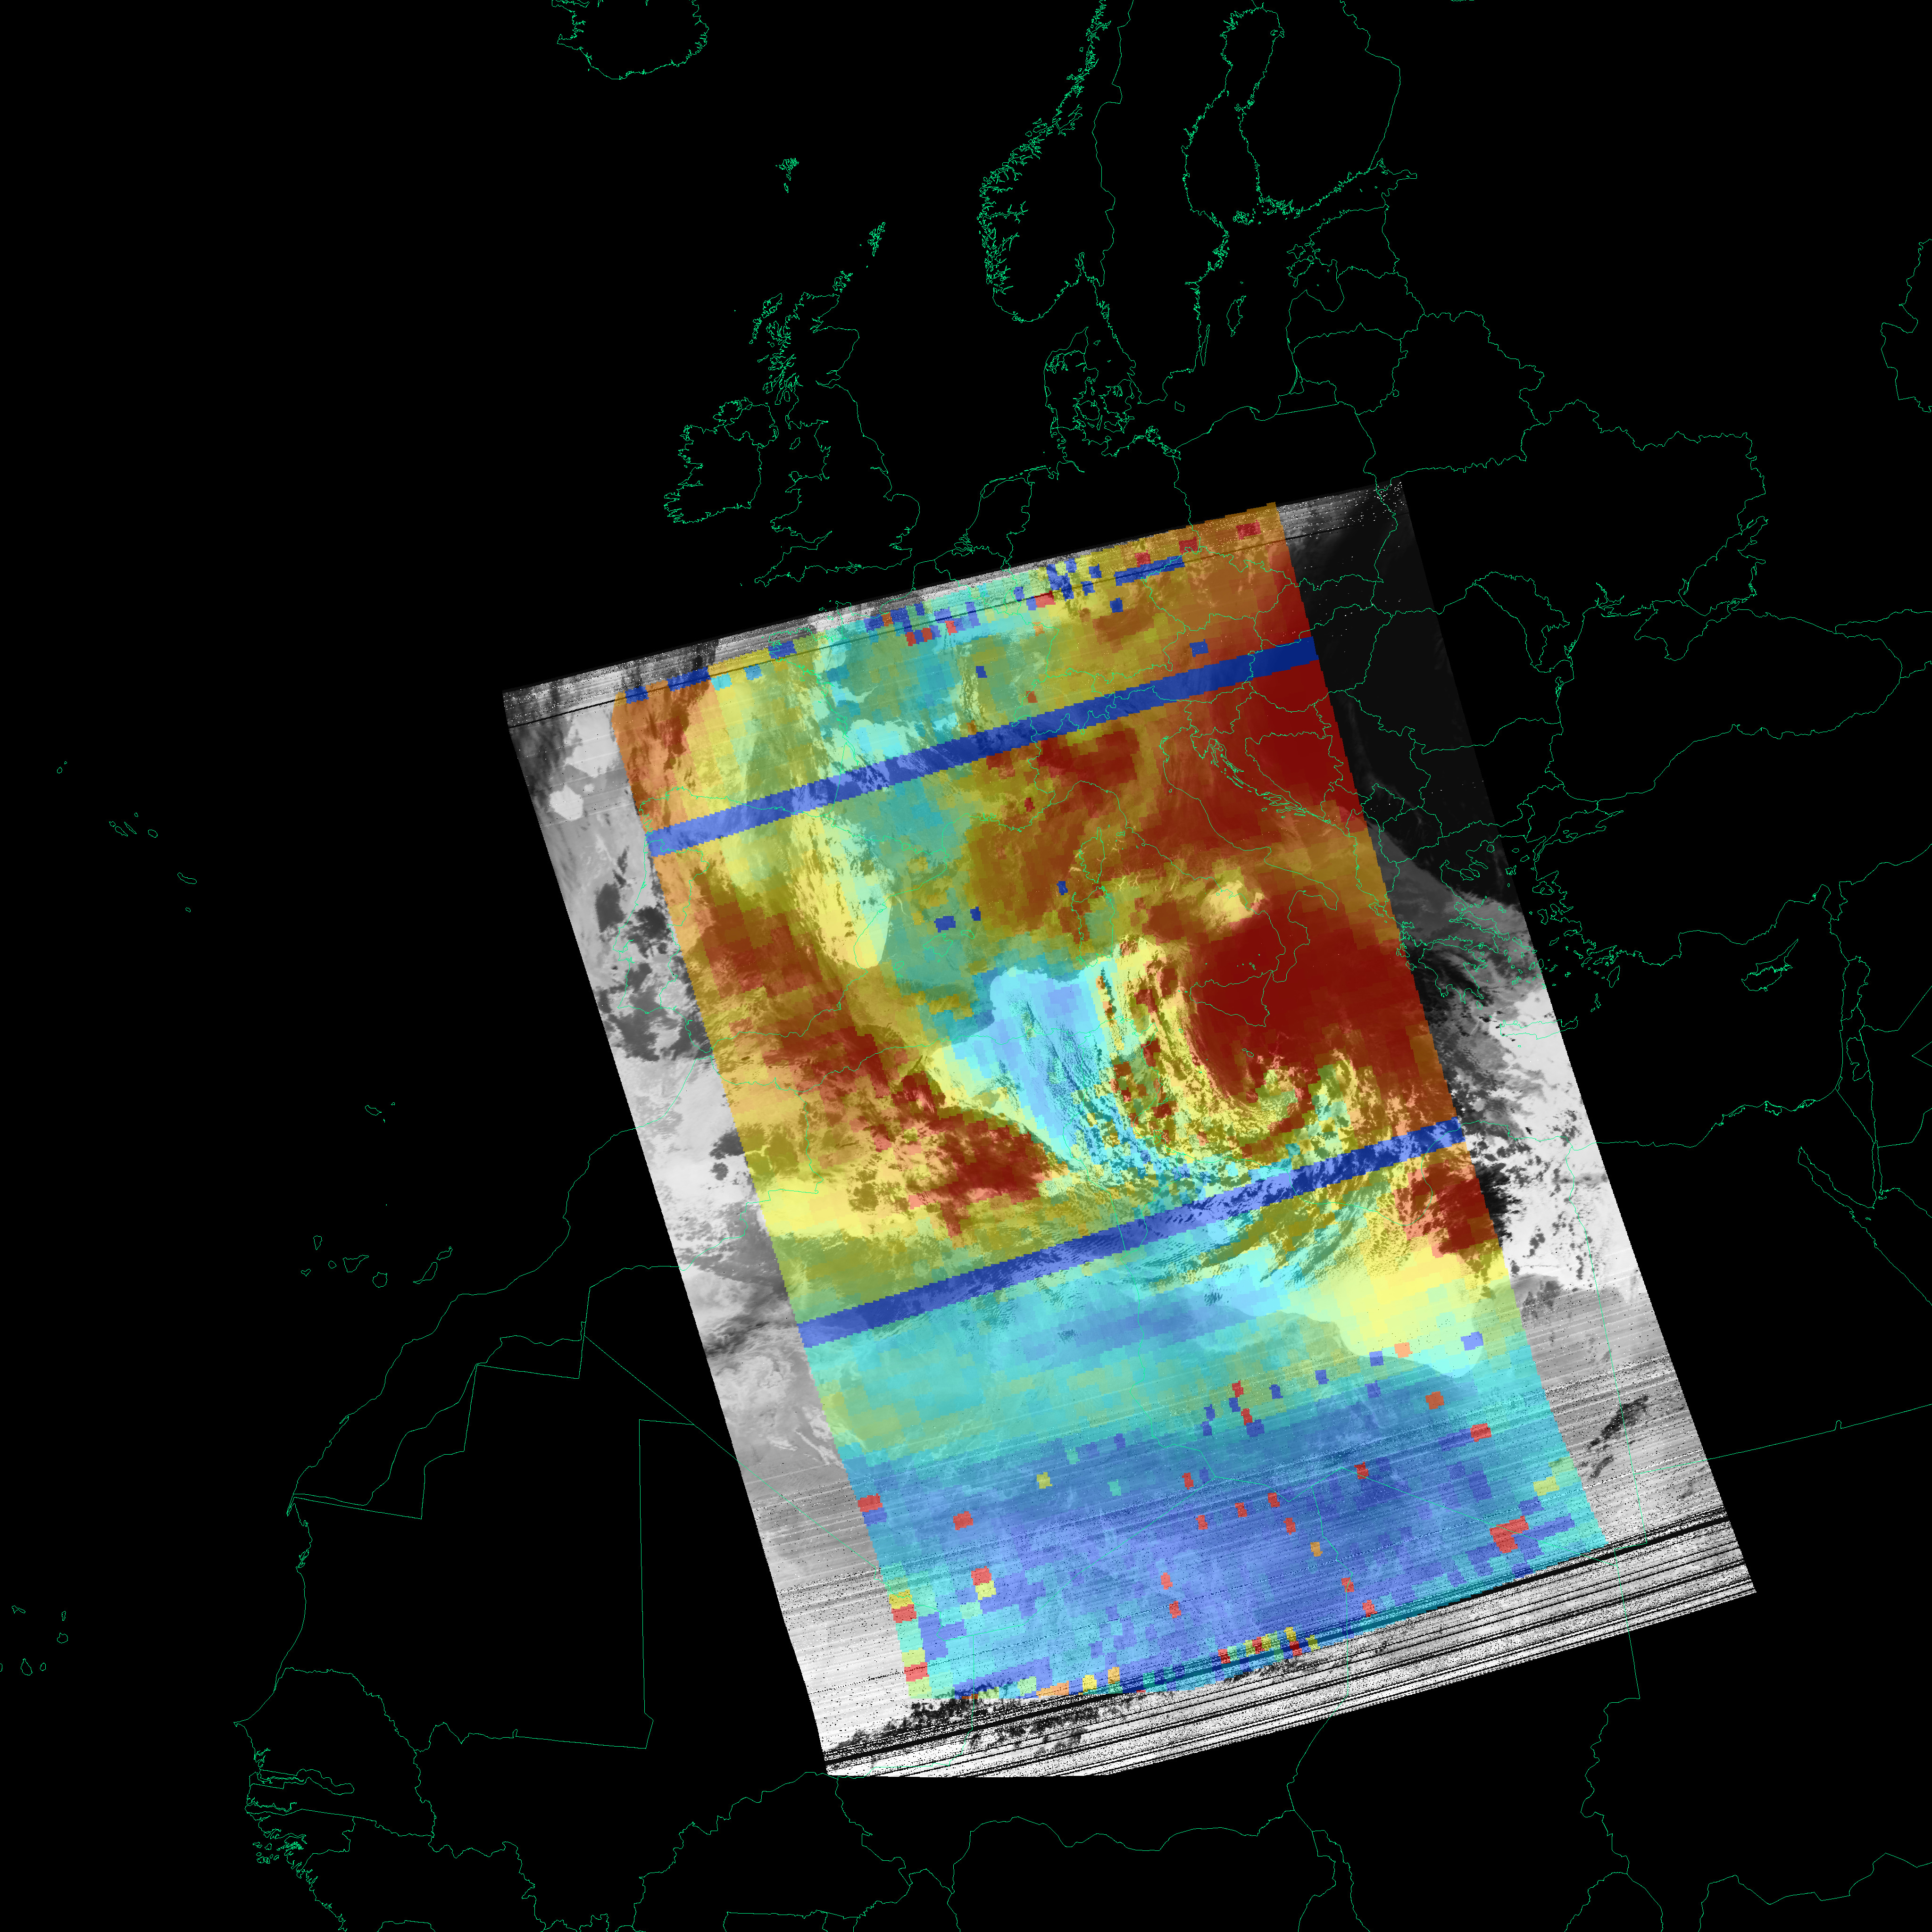
If you check the Projection checkbox, you can project the image on a map. This enables you to combine multiple satellite passes into a single image.
Advanced methods
Decoding with NOAA-APT and processing with WXtoIMG (Not recommended)
For advanced meteorology, SatDump might not be enough for now. Another program called WXtoIMG exists, but this program is abandonware and should not be used unless you have a reason to do so.
This method requires (NOAA-APT) to decode the images, and WXtoIMG to process them.
I repeat, this method is not to be used unless there is a reason to, as you'll see it is very inconvenient.
- Open NOAA-APT and select
Tools→Resample WAV - Select the SDR++ recording in
Input file - In
Output file, type the name of the output file as follows: WARNING DO NOT MAKE MISTAKES OR IT WILL FAIL TO WORK!YYYYMMDDHHMM.wavwhere HH and MM are in UTC time only. - Leave everything else untouched
- Press Resample and close NOAA-APT or WXtoIMG will fail to work on Windows.
- Open WXtoIMG
- Click on
File→Open Audio Fileand select the output file from NOAA-APT. - From the
Enhancementsmenu select the appropriate enhancement.
Error messages
- WARNING: Keplers are outdated: You must update the Kepler orbital elements. Open the
weather.txtfile found in thetlefolder in the WXtoIMG installation folder. Copy the content of this file from Celestrak in theweather.txtfile - WARNING: Can't get telemetry data: the signal was too weak or there was too much interference.
- WARNING: Enhancement unusable: A wrong enhancement was selected. Usually it means you are trying to use an enhancement that requires visible light at night when the satellite transmits infrared data.
- WARNING: Could not find matching pass: The file was named wrong in step 3, or WXtoIMG confused the satellite pass. Rename the file, and if it persists go to
Options→GUI Options, tickEnable expert mode, restart the software, select the file again, then go in theSatellitemenu and select the correct satellite. If it still won't work, try moving theGround station locationsuch as it roughly sits in the middle of the pass, to help it find the correct satellite.
Receiving both METEOR and NOAA satellites together
Sometimes, METEOR and NOAA satellites happen to pass at the same time. It is possible to use SDR++ and receive both at once. The procedure is explained in the METEOR guide.
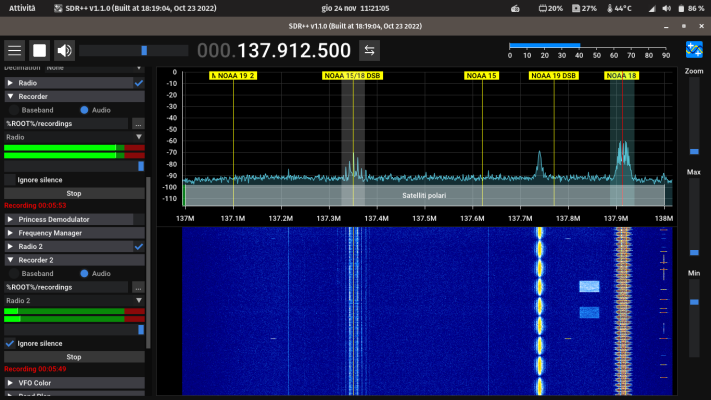
Receiving both NOAA APT and NOAA DSB signals together
NOAA satellites broadcast an additional signal called a DSB beacon. It looks like a fairy tale castle when viewed on the FFT spectrum panel, and carries data from the HIRS, SBUV and SEM instruments, as well as satellite telemetry.
It is possible to receive both the APT and DSB signals at the same time, by making use of the VFO feature on SDR++.
- Scroll down to the
Module Manager. - Type in
Radio 2, and selectradio. Click on+. - Type in
Recorder 2, selectrecorder. Click again on+. - A new
Radio 2module will have appeared at the bottom of the left sidebar, together withRecorder 2. Drag them near the oldRecorderandRadiomodules, for your convenience later. - In the
Recordertab, make sure to selectRadio 2in theStreamdropdown box. Leave everything else as is by default (Leave it in Audio mode, do not select Baseband). - You will notice you now have two VFO (filters) in the main FFT spectrum panel. You can drag these around.
- Click on the
RadioFFT and set it up for APT (as previously explained). - Click on the
Radio 2FFT and set it up for DSB by selecting the correct frequency (137.77 MHz for NOAA 19, and 137.35 MHz for the other satellites). Remember to selectRAWin the mode! - When the satellite appears, you will see the signal rise in both the APT and DSB VFOs. Click
Recordin both recorders to start recording both signals. - When the satellite goes away, stop the recording on both recorders before closing SDR++.
The DSB signal is linearly polarized and the antenna is quite close to the spacecraft's body, which means it will have a lot of fading and nulls. A V dipole is recommended, as tilting or otherwise moving around the V dipole can offset some of the nulls.

Processing the DSB signal
It is easy to process the DSB signal into imagery and data using SatDump.
- Go to the
Offline processingtab. - Search for
NOAA DSBand select it. - In the
Input filefield, select the.wavfile you recorded from SDR++. It will be in the same directory as the APT recording. - Make sure
basebandis selected asInput type. - In
Output directoryselect an empty directory to output files in. Leave everything else as is. - Press
Start.
Imagery will be produced in the selected Output directory, as well as available for viewing in the Viewer tab.
HIRS is a low resolution multiband sounder, and therefore it looks best when overlaid on APT imagery and projected. For further information on how to interpret HIRS data, read my meteorology guide.
Receiving more than one APT satellite at the same time
It is possible to use the method described above to receive multiple APT satellites at the same time, as often more than one satellite might pass above your location simultaneously.
The only difference is that, instead of selecting RAW for the Radio 2 VFO, NFM will be selected and the noise reduction/bandwidth settings will be the same as Radio 1.
It is of course possible to add even more Radio and Recorder modules, making it possible to receive both APT and DSB from two satellites at once, although in my experience due to the way the DSB antenna is mounted the results will seldom be very good in practice.
Automating the reception
If you wish to build an unattended automated weather satellite station, you can check out my guide here.
Have fun with your APT! You might also be interested in the high resolution signals (HRPT) transmitted by the same satellites.
Version: v1.0.1